Brand Specific Router Setup Guide: A Comprehensive Step-by-Step Tutorial
Setting up a brand new router can be a daunting task, especially for those who are not tech-savvy. However, with the right guidance, it can be a relatively straightforward process. In this article, we will provide a comprehensive and brand-specific router setup guide to help you navigate the process with ease.
Choosing the Right Router
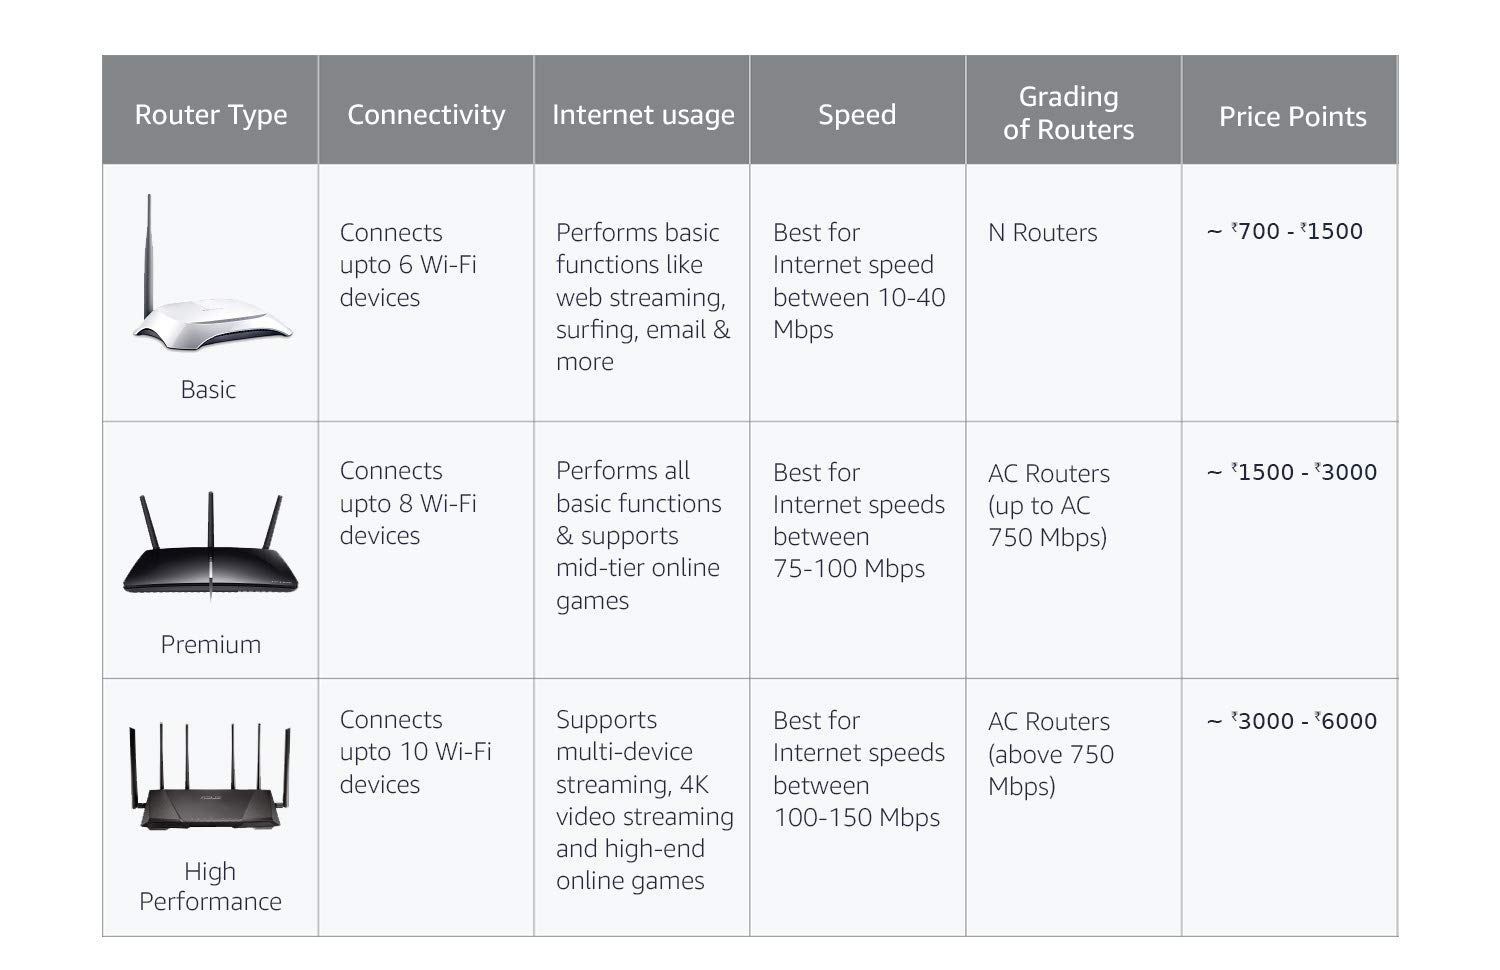
Before we dive into the setup process, it's essential to choose the right router for your needs. Different routers offer various features, speeds, and compatibility options. Make sure to select a router that meets your specific requirements and compatibility with your internet service provider.
Hardware Setup
Once you have chosen your router, it's time to set it up physically. Follow these steps:
- Unbox your router and modem (if it's a separate device).
- Place the router in a central location, ideally in a room where it can reach all areas of your home.
- Connect the modem to the router using an Ethernet cable.
- Connect the router to a power source.
- Connect any additional devices, such as a LAN cable or a Wi-Fi extension device.
Software Setup
Now that your router is physically set up, it's time to configure it using the software. The exact steps may vary depending on the brand and model of your router. Here are the general steps:
- Access the router's web interface by typing the IP address (usually 192.168.0.1 or 192.168.1.1) in your web browser.
- Log in to the router using the default username and password (usually printed on the underside of the router or in the manual).
- Change the default username and password to something more secure.
- Configure your wireless settings, including the SSID (network name), password, and channel.
- Set up your IPv6 settings (if applicable).
- Configure your Quality of Service (QoS) settings to prioritize devices and applications.
Advanced Settings
Most routers offer various advanced settings that can be accessed once you have completed the basic setup. These settings may include:
- Port forwarding
- Virtual private network (VPN) settings
- Wireless range extenders
- MAC address filtering
Brand-Specific Settings
Different brands may have unique settings and features that are not found in other routers. Here are some brand-specific settings to consider:
- For Netgear routers, you may need to access the Genie interface to configure wireless settings.
- For Linksys routers, you may need to access the Smart Wi-Fi interface to configure wireless settings.
- For D-Link routers, you may need to access the D-Link Cloud interface to configure advanced settings.
Troubleshooting Common Issues
Even with proper setup and configuration, issues may still arise. Here are some common issues and their solutions:
- Slow internet speeds:
- Incorrect password or username.
- Router placement issues (e.g., interference from other devices).
- Insufficient power or lost connection.
Conclusion
Setting up a brand-specific router can be a complex process, but with this comprehensive guide, you are now equipped with the knowledge to navigate the process with ease. Remember to stay up-to-date with firmware updates, adjust your settings as needed, and troubleshoot common issues to ensure a stable and secure connection.
Whether you're a tech-savvy individual or a beginner, this guide has provided you with the necessary information to set up your brand-specific router correctly. Happy networking!

 - LazyAdmin")


 - HP")


")
")