Writing a Check for a Payment Plan: A Step-by-Step Guide
In today's digital age, making payments is a relatively straightforward process. With the advent of online banking, mobile payments, and digital wallets, it's easier than ever to transfer funds and settle debts. However, there are still instances where writing a check is the most convenient or required payment method. This guide will walk you through the basics of writing a check for a payment plan, covering the essential steps and tips to ensure a smooth transaction.
Why Write a Check for a Payment Plan?
- Checks are still widely accepted and used in various industries, such as rent payments, business transactions, and gift-giving.
- Writing a check can be a convenient option when paying in person or by mail, especially when dealing with small businesses or individuals who may not accept digital payments.
- A payment plan check can also serve as a tangible record of payment, providing a sense of security and peace of mind.
Step 1: Gather Required Information
Before writing a check, ensure you have the necessary details:
- Recipient's name and address (or acronym if it's a business).
- Check date (today's date).
- Payment amount (the exact amount you're paying).
- Payment reference (if applicable).
Step 2: Open Your Checkbook
- Dated check line (where you write the check date).
- Payee line (where you write the recipient's name).
- Detail line (where you describe the payment or add any additional notes).
- Amount line (where you write the payment amount).
- Signature line (where you sign your name).
Step 3: Write the Check Date and Payment Amount
On the dated check line, write the current date using the correct format:
- Month (full name or abbreviation).
- Day.
- Year (four digits).
Step 4: Write the Payee and Detail Lines
On the payee line, write the recipient's name in full:
- Spell out the payee's name correctly.
- Use capitalize correctly the first letters of each major word.
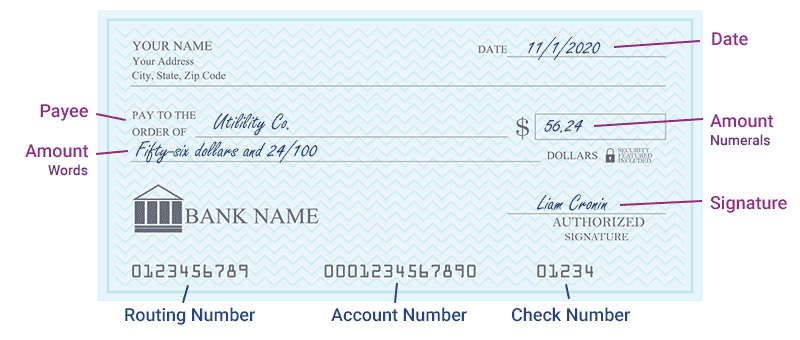
Step 5: Write the Payment Amount and Dollar Sign
On the amount line, write the payment amount using numbers:
- Write the numerals in the correct order (e.g., 100.00 for one hundred dollars).
- Include the dollar sign ($).
Step 6: Sign the Check
On the lower-right corner of the check, sign your name:
- Use the same signature you used when opening the account.
- Do not use a "X" or other alternative signatures.
Step 7: Keep a Record of the Payment
After writing and signing the check, keep a record of the payment:
- Store the check stub in a secure location.
- Make a note of the payment amount and date.
Additional Tips and Considerations
When writing a check for a payment plan, keep the following tips in mind:
- Always verify the recipient's information to ensure accurate payment.
- Be cautious when writing large amounts or using blank checks.
- Make sure to balance your checkbook regularly to prevent errors and overdrafts.
- Consider using online banking or mobile apps to track and manage your payments.
Conclusion
Writing a check for a payment plan requires attention to detail and a clear understanding of the necessary steps. By following this guide, you'll be able to create a secure and accurate payment method that meets your needs. Always keep a record of your payments and balance your checkbook regularly to avoid errors and ensure a smooth financial experience.


